Wednesday, June 22, 2011

Eco-Friendly Homes in 2030

As a final project for my U.S. History class, we were assigned to make a prediction on what something of our choice would be like in the year 2030 based on previous trends. Of course, I chose to go with a project that involved interior design. I decided to go with an eco-friendly theme, and worked from there.


My main creative part for the project was to design a room based on all eco-friendly products. Honestly, I had a blast putting it together and wouldn't consider it to be a difficult project at all.

The first thing I did was find websites and products that focused on being eco-friendly. Then, I put what I liked together into a mood board.


The starting points of the room were the paint color, which was "Oyster Shell" from Olympics line of paint with no VOCs, and the bamboo flooring which is an eco friendly product. Then, I gathered some of the main focal pieces in the room, including these armchairs, this bamboo console table, this coffee table (made from old wood that had been used for railroads, which I thought was awesome), and this bookshelf. From there, I gathered accessories such as fabric for curtains, wall art, a side table, a lamp, cool lighting, pillows, and this neat-o rug made from scrap leather.

Looking at these products was definitely a shocker... everything was super expensive! The total for everything? A whopping $13,358.95!!!! Hopefully these prices will go down based on high demand by 2030.

After some time procrastinating, I decided to make a sketch of what I wanted the room to look like:


Once that was done, I drew the whole thing again onto some poster board.


I knew I had to find colored pencils that would nicely match the colors of the furniture and accessories, so I blended different pencils together to find the colors I needed to match everything. Then, I simply labeled them all so that I knew what colors went where... that was I wasn't all crazy confused later on!


It was off to work I went and colored everything in!


After procrastinating a while longer (I found out the due date was extended), I finally put this bad boy together. This was pretty much my first room design EVER, so I wanted it to look like what real professionals make their presentations look like... I at least tried.


I printed out pictures of the individual products along with descriptions on how they're eco-friendly, as well as the mood board and drawing of the room layout. I spent about an hour just trying to figure out what went where and how I could arrange everything. I ended up taking half of a second poster and attaching it to the original one so that there was enough room for everything.


Not only did I have to make this poster, but I also wrote a 4 page report on how eco-friendly awareness is impacting design as well as society. However, most of that was filled with quotes that other people said... typical lazy thing to do, I know. All in all, I'm really proud of the turn out- I just wish it could be created into a real room! As far as the grade went, I got an A!! So I guess all of my "hard" work paid off....


This project helped boost me into creating more mood boards (for other people to use!), so I will be updating on that in the near future.


-Rachel :)

Sunday, June 19, 2011

This is Bad.

Really bad.

It's been over a month and I haven't updated! Well, since school is out and summer is finally here, I'll be updating more....right? I sure hope so! Anyways, over a month ago, I went on an overnight field trip to Philadelphia with my school and snapped some photos of the city while we were walking around. I think it's safe to say this will be added to my list of places I'd love to live in when I'm older. These are some of my favorite pictures from the trip that will be adorned on my wall...more on that later!


I'm really starting to get into photography! Now I know what career I can fall back on of interior design doesn't work... but interior design WILL happen, of course...


-Rachel :)
Sunday, May 15, 2011

Over the River and Through the Woods

Over Spring break I went with my Dad and brother to visit my Grandpa, and I never really saw the unique pieces my Grandma had put into the decor of their basement until this past visit. I felt inspired, and decided to take pictures of some of my favorite things. Sorry for the bad quality... morning darkness, wood paneling, and bad lighting don't really go together that well. :)


-Rachel :)

Saturday, May 14, 2011

Fresh Coat

This here is a project I did months ago, but have procrastinated on posting about. It's taken me WAY too long to share this project that I'm super proud of, so here it is:

Over 4 years ago, on a wonderful trip to Ikea, I decided to pick up one of these little drawer systems (the one in the middle). It was only fifth grade, and I decided it would be best used as drawers for my Build-A-Bear clothes (I had a whole area in my room set up for my build-a-bears; I was setting up room designs pretty early...even if it were for bears...). I felt like it needed to be painted to match the decor of the bear's room, so I decided on a purple. What purple may you ask?... BARNEY PURPLE. I know, not one of my proudest moments. After switching bedrooms and updating my room decor, this sucker stuck out like a sour thumb (no pun intended). Looking at this darn thing was really starting to bug me. So I had a master plan...FINALLY PAINT IT!


I wanted to do a cool design on it to make it a little more hip so I decided to do tree branches stretching across it. My first plan was to sketch it all out and get a feel for what I wanted it to look like. Then I went right to painting!


When painting, I sorta tried to follow the sketch I had made, but after a while, I sorta did it free handed. I first painted the fronts of the drawers with a coat of black paint, then did the branches in white. After that, I went and painted the base of the drawers black. I'm not the best painter in the world, but I'm super proud of the results. It has a natural look to it that I like and it shows that it was done by hand. So here's the official before & after picture...


I have to say, I absolutely love the turn out of it. Now, I have re-invented the function of it as well. For a while it was used as a jewelry/make-up system, but I switched that stuff out for my school journals, random papers, mail, and old receipts. It now sits on my bookcase and I love the way it looks sitting there.


So there you have it: that's my little project I completed a while back. Hopefully I will be repainting something again soon...so much fun!


-Rachel :)

Monday, April 25, 2011

Crossing it Off

Yeah.... it's definitely been a while. My life has been so busy lately, and I've gotten practically no time at home to myself! Between work, the spring musical, endless amounts of school work, and being on vacation, it's nice to just have a lazy day at home for once.

Anyways, it's time to update the ole to-do list.

There have been several things that I've got to cross of my list lately, including: organize my closet, get rid of my stereo and karaoke machine, organize my papers, wires, cables, bookshelves, financial papers, CDs, and movies, get a headboard, paint my walls gray, find room for hoodies and blankets, get rid of stuffed animals, get a new comforter, find a color scheme (more details soon), and organize my crafts. Whew. That's a lot. However, there are still quite a few things that I need to tackle....


I've had my guitars for quite a while, and haven't used them for quite a while. They pretty much just sit there and collect dust, and fill in that small corner in my room. I think it's time to say goodbye to these guys...


I know, it's gross. That's the surface of my desk. Between pencil markings and ice cream spots, my desk tops have become a sloppy mess. I will definitely be taking care of them today!


Well, getting new curtains was on my list of things to do, but I realized that I want to keep the ones I already have. What I did was I unknotted them so that they're more long and puddle at the bottom. However, they are extremely long and puddle too much, so I think I will be hemming/shortening them in the near future.


Alas. The left overs from "getting rid of junk". This is the junk that still sits in my room after clearing out my closet and junk drawers. Half the stuff I don't even know what to do with! I will be taking the day to go through all of it and put things where they truly belong. The boxes have been sitting in my room (and my sisters room for a while) forever, and it's time I finally deal with them. It's driving me nuts!


And there we have it. Stuff I have yet accomplished. I'm really determined to get my room to finally be complete, and look the way I want it to look. I'll be sure to get start cracking today.


-Rachel :)


Thursday, March 31, 2011

New Headboard

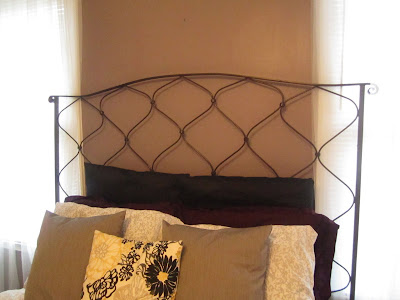
It finally happened. I got a headboard. Picking out a headboard was one of my birthday presents, along with painting my walls and getting a new mattress, so of course I went crazy over it. The two I was deciding between were both from Ikea, and neither of them really seemed to be the perfect match for me. Without losing hope, my mom continued to search Craigslist to find one. And alas, one morning, I came downstairs to make my breakfast and there it was, a picture printed out of this baby. I couldn't have been happier. It has such a unique pattern to it and was the perfect "inbetween" choice of the two from Ikea. So my mom and brother went and got it for me the following weekend right in time for my birthday. Then they brought it home. The seller on Craigslist had listed it as a full sized bed frame, but it certainly was made for a queen. The headboard stuck out about 3 inches more than it should have! Bummer, right? Actually, not really. :) The headboard had come along with a bed frame and a footboard which were queen sized as well, but the headboard was the only thing I could save. Now, it sits tucked behind my bed and I couldn't be happier. The last thing left to do is paint it black. As you can see from the photo, its a brownish rustic color- not exactly what I was hoping for. Also, there are several nicks and rust spots on the frame so we got special paint that will eliminate the rust and cover over the nicks to end up with the perfect color. It's still the same color for now, but once we have a free weekend (for once) and the weather is beautiful, we'll be sure to grab out the paint and paintbrushes.
(p.s.: see the new wall color? I'm lovin' it... queue the McDonald's commercial.)


-Rachel :)

And The Winner Is...

PLUM SMOKE! :)


I don't have much explaining for this choice... just that it's awesome! We did this a while ago (March 6th), so sorry for the delay :/. But here are some pictures of the process:

My two best friends came over to help me start painting. This is what happens when you give us paint brushes. :)


See how well it matches my black and white photos?! My Mom was super happy with that because that's the exact color in the photo she wanted me to go with.


After peelin' off all the tape.


So yeah, those were pretty much "in progress" photos. My room has been such a mess lately and I've had so much going on that I haven't really finished yet, but I"ll be posting more soon!


-Rachel :)

Friday, March 4, 2011

The Great Debate

Picking a paint color is harder than I thought. I decided to take advantage of the beautiful day last Sunday and go with my Dad to pick up some paint samples and make my final decision. I knew coming in that I wanted to get Porpoise because I basically fell in love with the color swatch, but I wasn't sure if it would be too dark, so I got the next brighter shade as well.


My Dad also insisted on getting tape, so I (unevenly) taped up boxes on my walls and got going on the paint.


I mainly wanted to do it on two seperate walls was to get the feel for the colors. I put them next to my black and white picture to see how it would look, and then next to the flower picture to see how the color would look with all of the colors. And this is the final product:


So... there were some unagreements. First off, my Mom kept saying it would make the room to dreary. Then I started thinking about it and realize she was a little right. Plus, the grays were too light- it would too WAY too bright and in your face with all of my white furniture. So, off we went to find a purpley gray color. I already had a paint chip of Behr's Plum Smoke and I thought that it went well with the colors in my room, and was dark enough to keep the room warm. My sister took me this time to get the paint samples, and while we were there, we also decided to grab a darker color that caught our eye. And this is what it looks like on my wall:


Plum Smoke (the lighter one) looks taupey/brown, right? Yeah, not what I was going for. At first I was a little dissapointed, but after a while, the paint sorta grew on me. I thought to myself "maybe this is the type of color I need, maybe gray would be too cold, maybe this will warm up my room"... just a bunch of maybes. When it's daylight, it looks gray, but when I have my lights on, it looks brown. I also decided to see if my fabrics would go well with it, and they do!


It's close to the color, without being too matchy matchy. And, if you look at the color long enough, it looks a little purple...right? Well we'll just have to see how this all turns out...
-Rachel :)